Plants That Thrive in Hot, Arid Climates (Welcome to Colorado!)


Water is a precious resource, we all know that for a fact. In Colorado, you will typically see either long periods of dryness, or downpour after downpour.

If you’re used to some of the more delicate flower breeds like petunias, you will likely be in for a surprise when you find out that no matter the amount of sprinkling, watering and raining, your gorgeous flowers have shriveled up to the point of no return.

Let’s avoid that for you this year (or if you are new or planning to move to Denver soon), and go over how to garden in Colorado. Which plants will endure?

There are many plants that thrive from little to no water and come up every year, leaving you with little to do each summer but enjoy the fruits of your labor (from last year!).

Here is a comprehensive list of some of our favorite Colorado-loving perennials and a little about each one to make your garden a success this year:

  • Dianthus

Dianthus.jpg

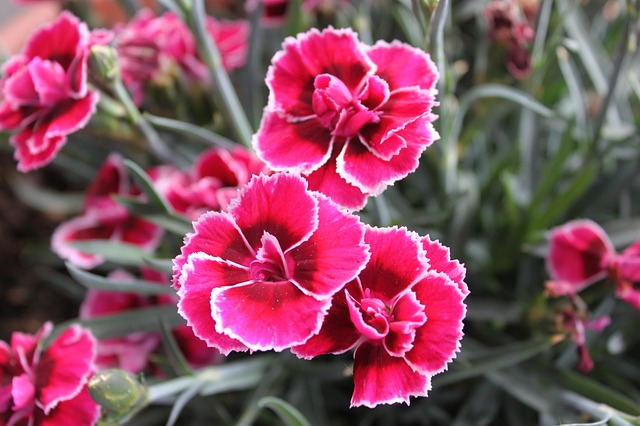
Dianthus flowers are fragrant and come in several color varieties including pink, red and white. They have notched petals and are beautiful for cutting and arranging in a vase. They are even deer resistant.

The best time to plant Dianthus is in the Spring or Fall about 6 – 12 inches apart. After the first frost, cut the stems to about 1 – 2 inches above ground. Stake the stems when they first begin to grow as these can be very tall plants.

Dianthus multiply easily, so every 3 – 4 years, you can take the plants, divide them up and replant them for even more coverage.

  • Rocky Mountain Penstemon


Rocky Mountain Penstemon.JPG


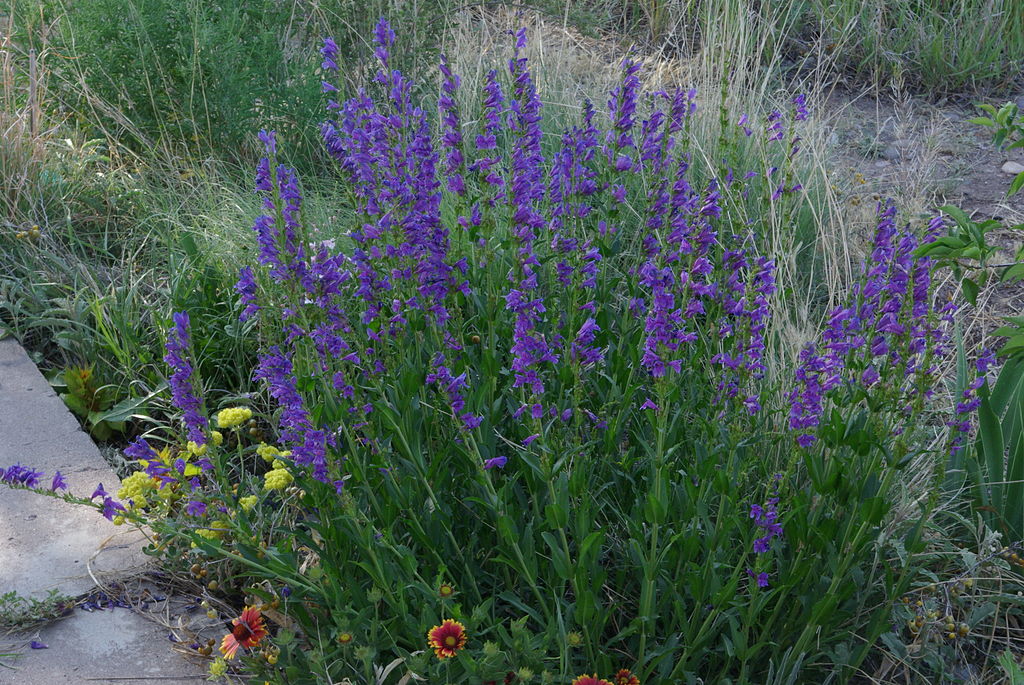
This plant is a relative of the evergreen and appears as a small bush with purple flowers. It grows best in drained soil (think: dry) and can handle high altitudes and plenty of direct, brutal sun.

Rocky Mountain Penstemons also attract bumblebees, making your garden an attractive spot for them to pollinate and maintain an insect ecosystem, which is great for the environment and creates a safe haven for them.

The purple flowers are exquisite. Tall and straights, they bloom consistently and add height to your landscaping. They are also native to the region, providing a stable and natural addition to the area’s flora.

  • Liatris

Liatris.jpg

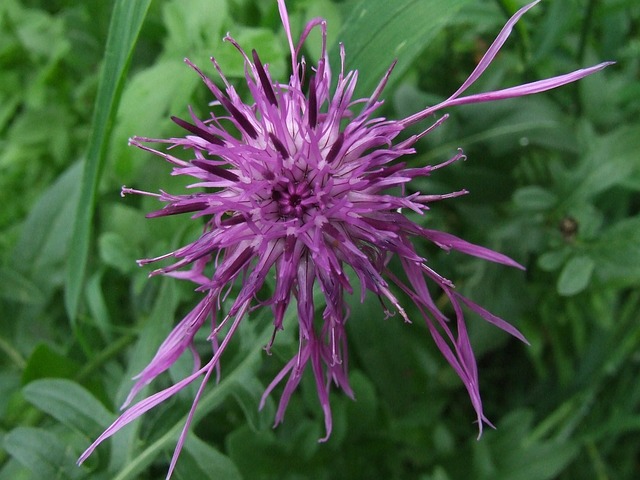
Liatris varieties are one of the easiest plants to grow in the Colorado area. They are able to withstand the blazing sun without much water, for long periods of time.

They are a prairie wildflower that grows somewhat in the shape of a small bush with leaves and greens at the bottom and pinkish/purple “paintbrush” appearing blooms.

Liatris can grow from 1 – 5 feet tall depending on how close they are to other plants or obstructions and how much (or too much) nutrients they receive, so to get to their full growth, plant your seeds a bit further apart, at about 12 – 15 inches.

  • Rocky Mountain Columbine

Rocky Mountain Columbine.jpg

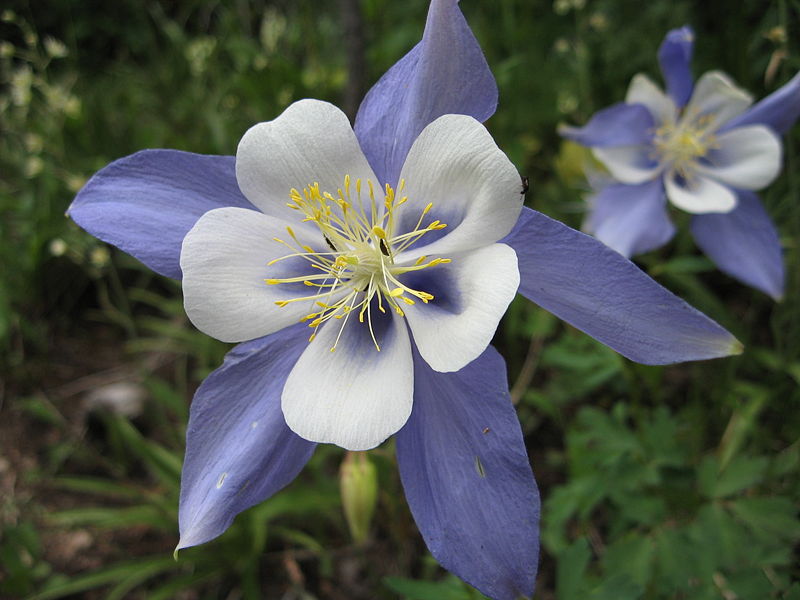
It’s not surprising that the Colorado State Flower, the Rocky Mountain Columbine, would make this list. It has been a favorite of Colorado residents for over a century, voted into “statehood recognition status” in 1891 by local school children.

While most plants on this list can grow in full sun in arid conditions, the Columbine is just slightly more delicate and should be planted in partial shade. They are a hardy perennial, however, so they can withstand more sun and less water than the average flower.

Fertilization is a good idea for Columbines and can help them be most vibrant. And, make sure you do not overwater as they thrive in well-drained soil.

Columbines are resistant to insects and diseases and will grow all season long, making them a perfect staple to your Colorado garden.

  • Poppy Mallow

Poppy Mallow.jpg


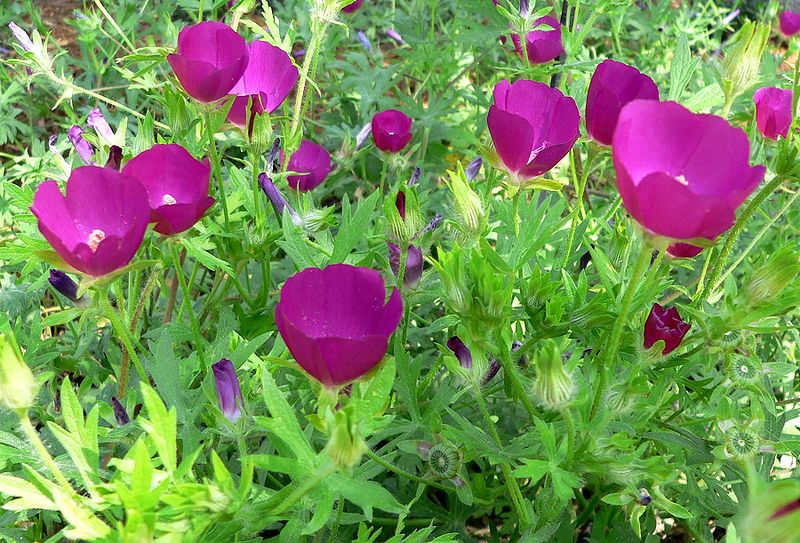
Poppies are beautiful plants that come in a variety of colors, including the most well-known orange colored variety. In Colorado, you will find orange and a magenta variety, among others with speciality growers and seasoned landscapers.

Poppy Mallows (and poppies in general) require a different method of planting than many other flower varieties. The best time to plant the seeds is in the fall, or even in the winter. Winter? Yes. Poppies need a period of “stratification” or “period of exposure to cold” before they will germinate. Make sure you plant in bright, bright sun as they absolutely love it.

They do have a short bloom season, so these are often planted with other annuals and perennials for variety in color once the poppy blooms have faded. They are a great accent and do very well in Colorado climates, coming back year after year to make your garden the envy of your new neighborhood.

Want more? Check out these local resources.

Now that you know to avoid the tempting displays at the local shopping centers, make sure to check out a local gardener for these and many more Colorado-happy varieties of plants. A great idea is to create a Pinterest board of the flowers that do well here and bring your phone to the market. Show the pictures and names and get the info you need from experienced “bloomers.”

Another way is to check out this guide from 5280 (one of our local Denver magazines). It goes into not only the perennial flowers mentioned here, but also great annuals that do well, vegetables that will make it, and herbs that will season your dishes and grow naturally well in our local conditions.

And, if that’s not enough, geek out on Plant Select’s comprehensive “e-guide” here that breaks it all down for you.

Ready to start planting the seeds in your Colorado move?

Contact us here to get sent free listings exactly in your price range, neighborhood, style and size. It’s so easy and better than browsing because these days, you can’t really trust what’s online commercially, but you can trust the National Association of Realtors, which has the only truly up-to-date listings in the area. The Association stands behind honesty and accountability in real estate and it’s the only system we us. Just click here to send us a note on what you’re looking for and we’ll get you all set up.


Conscious Real Estate Welcomes Elizabeth Lord to Our Team!

We couldn’t be more thrilled to announce that Elizabeth (Ellie) Lord has chosen to be our newest broker associate.

She is passionate. She is knowledgeable. She chose to work with us because of our philanthropic business model. Let us tell you about all things Ellie…

ellie-headshot

Elizabeth “Ellie” Lord’s personal mission statement reads; “my purpose is to create a life that is rewarding personally as well as professionally, and in return, enhance it through active community involvement.” She lives this creed every day, and through everything she does.

  Born and raised in Seattle, Ellie grew up surrounded by an amazingly supportive family and a herd of golden retrievers. After eight years in the residential design and construction industry, she moved to Denver for graduate school at the University of Denver. With a graduate degree in real estate and construction management, and a new found love of Colorado, she reestablished her award winning design business, Elizabeth P. Lord Residential Design LLC, in Denver. In addition to her extensive experience in residential design, and her background in construction, she offers her real estate clients the opportunity to use her wealth of knowledge to achieve the maximum value out of their home in preparation of selling, or insight into making a potential house their personalized space with design advice.

In her spare time, Ellie enjoys traveling the world and thrives on experiencing new adventures. After participating in a Habitat for Humanity build in New Zealand, she chose to live a life of gratitude and has continually pursued opportunities to give back to her community. She volunteers with the Golden Retriever Rescue of the Rockies and the local Habitat for Humanity chapter, as well as donating design services to charitable organizations. She recently purchased a condo in Wash Park, and adopted a Bernedoodle, who will be trained to become a therapy dog.


Issues to Avoid When Remodeling a Historic Home

KONICA MINOLTA DIGITAL CAMERA

Are you the new owner of a historic home and you’re itching to remodel?  Take care to preserve the historic features of the home to maintain its value.  Here are some things to consider…

Many owners of historic homes try to do what’s hot right now, but what’s hot right now won’t be hot in 10 years.  What will maintain the home’s value is to remain true to the era of the home.  I can’t tell you how many Ikea kitchens I have seen in the past year showing homes in Denver!  Here’s the thing – those kitchens do just fine in a condo that could be done in any style, they go along fantastically with the style of 1950’s mid mod ranches!  But they don’t match Denver squares, Victorians, or Craftsmans… at all.

So, what should homeowner’s do?  Tear out almost nothing and restore what’s there.  This will be better for the home’s value, it’s easier on the wallet, and it’s more eco-friendly.

Certainly, go ahead and update the heating, cooling, and plumbing systems, so homes are comfortable, safe and more energy-efficient.  As the owner of a home built in 1899, I give you my blessing to put in a walk-in closet if your closet is far too small to ever contain your clothing – though put it somewhere out of the way.

– Keep the cabinets.  Don’t pull out your solid wood cabinets.  It is difficult to even find cabinets made of a similar quality these days! The newer manmade materials are not made for years of wear and tear, they don’t handle moisture well, the laminate pulls away, and the pulls come off.  Instead, strip and refinish the wood and add newer pulls.  It looks better, lasts longer, and will save money.

– Refinish the tubs and sinks. To give an old porcelain bathtub a new coat costs about $400. A new tub can run more than $1,000, not including demo and installation.

– Save wood floors. Covering old wood floors with cheaper inferior tiles or carpet is not cool.  Definitely do not have your original flooring removed!  You can fix floors that have been burnt, flooded or even covered in pet stains. It is always cheaper and more authentic to refinish existing floors and patch sections where needed. You can always get the patch to match.

– Clean old tile. Old tile floors or other tile surfaces look worn out usually because they are filthy. Don’t tear them out until you’ve given them a good cleaning.

– Make counters authentic, by avoiding products that weren’t available when the house was built. This means nothing manmade, like laminate or Corian, and nothing modern, like glass tiles. Go for wood counters, like butcher block, or classic marble, and occasionally granite. Ceramic tiles work in homes built after 1930.

– Keep the walls up. Open floor plans are a trend, but may not belong in old houses.  After a couple years of living in an open floor plan, people often don’t want it anymore.  Before removing a wall, try living in the house for six months. If you still hate the wall after six months, go ahead and knock it down.

– Repair, don’t replace, windows. They are important to the home’s historic value. Old windows leak and are drafty because they haven’t been properly maintained. Have them repaired and weatherstripped so they’re efficient.  Adding historically accurate storm windows outside can boost efficiency.

If you’re interested in buying or selling a historic Denver home, call Allison Parks, Conscious Real Estate’s owner and principal broker at 303-908-9873 or email [email protected].

A Comparison of Roofing Materials

Not all roofs are created equal.  Here is a comparison of the different types of roofing materials, so you can find which roof is best for your home.

Asphalt Shingle is the most common roofing material, because it’s the least expensive and requires minimal skill to install. It’s made of a fiberglass medium that’s been impregnated with asphalt and given a surface of sand-like granules. Two basic configurations are sold: the standard single-thickness variety and thicker, laminated products. The standard type costs roughly half as much, but laminated shingles have an appealing textured appearance and last roughly half as long (typically 25 years or more, versus 15 years plus). Prices range from $50-200 per square foot.  (Depending on the type of asphalt shingle with installation, an asphalt shingle roof can cost many times that.)

Shingle roof pattern for textured background

Wood was the main choice for centuries, and it’s still a good option, though in some areas, fire codes forbid its use. Wood roofs are usually made of cedar, redwood, or southern pine; shingles are sawn or split. They have a life expectancy in the 25-year range like asphalt shingles, though are more pricey at $350-450 per square foot.

Natural wood shake roof

Metal.  Aluminum, steel, copper, copper-and-asphalt, and lead are all durable and more costly roofing surfaces. Lead and copper/asphalt varieties are typically installed as shingles, but others are manufactured for seamed roofs consisting of vertical lengths of metal that are joined with solder. These roofs start around $250 per square, though can cost up to $750 per square.

Modern design vertical roof window with black light metal covering

Modern design vertical roof window with black light metal covering

Tile and Cement – The half cylinders of clay tile roofing are common on Spanish Colonial and Mission styles; cement and some metal roofs imitate tile’s wavy effect. All are expensive, very durable, and tend to be heavy.  Clay tile roofs are likely to last 50 plus years, and will generally cost between $800-1000 per square foot.  Concrete tile is expected to last just as long, though is cheaper at $300-500 per square foot.

Peak of a clay tile roof with half round shingles against a blue sky in southern florida

Slate is among the most durable and long lasting of all roofing materials. Not all slate is the same—some comes from quarries in Vermont, some from Pennsylvania and other states—but the best slate shingles will outlast the fasteners that hold them in place. In fact, slate roofs up to 100 years old are often recycled for reinstallation with the expectation the material will last another century. Slate is among the most expensive of all roofing materials – prices typically start at about $800 a square going up to $2000 per square—and are very heavy.

A Slate roof shingles background

Solar shingles are photovoltaic cells, capturing sunlight and transforming it into electricity. Most solar shingles are 12 by 86 inches and can be stapled directly to the roofing cloth. Different models of shingles have different mounting requirements. Some can be applied directly onto roofing felt intermixed with regular asphalt shingles while others may need special installation. Solar-shingled roofs have a deep, dark, purplish-blue color, and often look similar to other roofs. Homeowners may be drawn to solar shingles because of their aesthetic value, allowing the homeowner to utilize solar power without large panels on their roofs.

shingles-solar

Note:  Not every roofing material can be used on every roof. A flat roof or one with a low slope may demand a surface different from one with a steeper pitch. Materials like slate and tile are very heavy, so the structure of many homes is inadequate to carry the load. Consider the following options, then talk with your designer and get estimates for the job.

5 Tips for Selling Your Home in Denver in the Spring

potted plant, gardening tool, gloves, paint brush & paint can

Spring weather can be a challenge if you are selling your home in Denver. One day will be warm, the next day may bring snow. The weather may be windy, sunny, or both. As a seller, you need to take advantage of the season’s offerings to bring offers in.  This is time right before the market heats up and you want your home to stand out among the competition!

1)  First, it is time to begin taking care of your lawn – your lawn is the outdoor’s carpet. Landscaping makes a big difference when you are selling your home!  Hard rake, fertilize, and aerate your lawn now. Doing so will cost $75. The best time to do so are just before a spring snow, or during a warm period when you can water.  This brings us to the next point – water. Take advantage of the warmer days, and water your grass. It is not advisable to turn on a sprinkler system just yet, but a $10 oscillating sprinkler for 20 minutes will do the trick. (Don’t forget to unhook your hose when complete as to not freeze your pipes!) A great tip I learned is to use an organic green pigment to make your lawn seem greener than your neighbors. You can do this for mulch beds as well.

2)  Since the grass is dormant, now is a good time to edge the sidewalks and along the driveway, if edges along fences and concrete walkways and patios are neglected. Cut overgrowth now, and use a turkey baster to gently distribute spent cooking oil to prevent future weed and grass growth. Remember, do not let this oil come in contact with fences and plants as it might stain or kill.

3)  Revive your mulched garden by fertilizing and watering as you would with your lawn. To revive sun-bleached mulch, purchase an attachment for your hose diffuser. Add a tablespoon of olive oil, and shake regularly as you spray only the mulch. A leaf blower and a hose will remove dirt, debris, and revive rock beds.

4)  Colorado temperature extremes are also hard on concrete. Your local home improvement store will have caulk and concrete fillers that will preserve soil related cracks in cement stairs, patios, and driveways for less than $100.

5)  Finally, bring out the plants!  Temperature resistant plants like petunias can go in the ground, and less hardy tulips and lilies in your existing planters which can be covered or brought inside during the inevitable cold spell.

If you would like assistance with buying or selling your home in Colorado, please contact Allison Parks at 303-908-9873 to get started!  Remember, Conscious Real Estate always contributes 10% of all commissions to the nonprofit of your choice.

A Comparison of Countertop Materials

Granite

A natural stone, granite is a popular option for it beauty and durability. Granite is the toughest and densest of the pure stones, providing a kitchen countertop that’s extremely scratch resistant and may keep its luster longer than most materials. Granite slabs are of the more expensive of kitchen countertop surfaces, though it’s still a practical material in that is nearly indestructible.

A drawback is that granite (and the other hard materials listed) is that it is hard on your crockery. You will notice that after a time, your crockery has managed to develop a number of chips.

Kitchen interior closeup with red roses and dishes

Marble

Another pure stone, marble is considered elegant and will last longer than most kitchens. It is nevertheless of the more expensive countertop options and requires specific care: acidic foods and liquids like orange juice will etch the finished surface of a marble kitchen countertop.

Slate

Due to it richness and beauty slate is usually used for inside purposes including kitchen counter tops, rest room sinks or fire surrounds. It can be used in both trendy or traditional kitchens. Slate is durable, strong, and can withstand onerous use. It is less expensive than marble.

Concrete

Concrete countertops are a fantastic complement for industrial and contemporary kitchen designs – available in pre-formed sections or poured and fashioned on-site. Concrete is a good material for unusually formed counters and can be stained any color, though the most popular shade is a natural gray.  Concrete kitchen countertops are expensive, require a sealant, and have to be handled with care. The countertop can crack if the concrete contracts.

Timber

Timber always adds great value to any kitchen. It is simple to re-finish – whether it’s due to damage or simply to fit in with your new decor. There are a number of timber finishing products that are extremely durable. Bamboo counter tops have a very good flammability rating, so are particularly suited to being used for a kitchen counter top. Another specific characteristic of bamboo, is that it tolerates moisture very well compared to other timbers.

Stainless Steel

Advantages are; very hygienic, easy to wash, has ability to face up to extreme wear and heat. Stainless-steel can offer a fashionable kitchen. Stainless steel can be noisy and difficult to repair when scratched

Tile

Tile surfaces can handle scorching pans, are heat and stain resistant as well as having a wide range of styles available. There are many types of tiles including ceramic, porcelain, quarry, glass, pure stone and mosaic. It has good design flexibility. Tile can usually be used for trim or back splashes. The downside of tile is that the grout can be easily stained.

Additionally tiles are easily chipped or cracked.

Pressed boards (bonus)

The most common are the Formica® type tops. These tops are made from chips of wood pressed together and covered with a melamine plastic surface. These tops are the cheapest option, but also the least durable. Exposure to water will cause these tops to swell and the only option when damaged is replacement. Another point for consideration, is that plastic is not a food friendly surface. It has been scientifically demonstrated that the cuts in plastic harbour gems.

Recycled Glass

A sleek and modern look, combined with a low carbon emissions production process make recycled glass countertops an environmentally preferred product.  These countertops blend glass and stone in a variety of colors, making an attractive finished product.  Recycled glass countertops are also stain, scratch, and heat resistant and require little care and maintenance.

Should I Get a Home Energy Audit?

illustration of green house on half earth with colorful butterflies

If you would like to implement energy-efficient upgrades on your home, but don’t know where to start, a home energy audit is a great place to begin.  Many of these upgrades not only make your home more efficient, but will make your home more comfortable and healthy.  If you find your home is too hot in the summer, too cold in the winter, or if you know your bills are too high for the size of your home, you should definitely consider an energy audit.  Also, homes with green features are quickly rising in popularity and sell faster and closer to asking price.

Certified Energy Auditors use various tests and tools to produce a detailed diagnosis and specific solutions to make your home more efficient and healthy.  Auditors will do a visual inspection of your home to find leaks in doors and windows and to check your insulation levels.  Blower door and infrared camera diagnostic tools can measure the air leaks from inside your home.

Energy auditors seek to find improvements that are specific to your home, as every home and region are different.  For instance, a home in a more humid region should take caution before sealing leaks, as this could cause a potential humidity build up.

Colorado residents are eligible for rebates from Xcel energy for energy-effiicient upgrades.  Also, customers using Xcel energy are provided with a list of Certified Energy Auditors.  Please note:  auditors on this list are registered with Xcel, but are not necessarily recommended, so consumers are encouraged to conduct their own research before choosing an auditor.

Groundwork Denver, a nonprofit whose mission is to bring about the sustained improvement of the physical environment and promote health and well-being also have BPI-certified energy specialists to investigate your appliances, furnace and insulation to identify and prioritize energy-saving improvements. They then provide education and resources on how to implement those improvements, connections to other resources (weatherization funding, home rehabilitation programs, rebates and local contractors), and a summary report of findings and recommendations.

Just by identifying simple changes, audits can save you $5 to $300 a year on energy bills.  This energy audit will cost $150, and for another $50, they can implement minor upgrades during the audit.

Create Natural Light in Your Home with Solar Tubes

solar-tube

Solar tubes, also called SolaTubes and light tubes, are an attractive and energy-efficient way to bring natural light into your home.  These are great for homes in historic Denver neighborhoods, as many of the homes were built very close together and don’t get much light.  Our older homes also usually have attics and solar tubes are literally a tube that goes through the attic.

A tube lined with highly reflective material leads the light rays through a building, starting from an entrance-point located on its roof or one of its outer walls.  The entrance point usually comprises a dome, which has the function of collecting and reflecting as much sunlight as possible into the tube.

Solar light pipes, compared to conventional skylights and other windows, offer better heat insulation properties and more flexibility for use in inner rooms, but less visual contact with the external environment.  Solar tubes are also considerably cheaper than skylights.  They can also be helpful for people who suffer from seasonal affective disorder by bringing more natural daylight into the environment.  A home with good lighting also will have an increased value and sell more quickly.

If you are savvy enough to install your own solar tube, you can purchase one for under $200.  To have it installed might cost closer to $500, depending on which company you choose.

Insulating Your Water Heater

A boiler water heater, water droplet, and a flame.

Water-heater efficiency is a boring topic, but water heating is  actually the second largest energy expense in your home, accounting for around 18% of your energy bill.  If your water heater is older and less efficient, you can consider getting a newer model, using less hot water, turning down the thermostat on your water heater, OR you can insulate your water heater and hot water pipes.

Insulating your water heater will cost around $30 – you can find pre-cut jackets or blankets available from around $20.  This will save you $20-45 annually on energy bills, so you should get your return on your insulation investment in about a year.

1.) Turn off the water heater.  For electric heaters, turn off the breaker at the electric panel. For gas water heaters, turn the gas valve to the “Pilot” position.
2.) Measure the height of the water heater and cut the blanket to fit if necessary.  Leave the top of the water heater open—it is important not to block the vent on top of a gas unit.
3.) Wrap the blanket around the water heater and temporarily tape it in place.  For ease of installation, position the blanket so that the ends do not come together over the access panels in the side of the tank. Some tanks have only one access panel.
4.) Using a marker, mark the areas where controls are so that you can cut them out.  For electric water heater units, there will be two panels on the side of the tank. For gas, you’ll need to mark an arch-shaped hole around the gas valves and burner. Be sure to leave plenty of room around the valve and burner areas below. Make the opening at least 1 inch wider than the valve and burner area. Also, mark the area where the pressure relief valve and pipe are. This will be a pipe that sticks out of the side of the water heater.
5.) Install the blanket.  Be careful to line up the cut out areas and then tape it in permanently in place.
6.) Turn the water heater back on.  Don’t set the thermostat above 130ºF on electric water heater with an insulating jacket or blanket – the wiring may overheat.

10 Ways to Increase Your Home’s Value

Small House on Stacks of Hundred Dollar Bills Isolated on a White Background.

Whether you want to sell your home now, or well… never, it is always a good idea to increase the value of your home.  Here are 10 smart ways to maintain and improve your home value.

1)  Let There Be Light – Lighting can enhance a home’s appeal in many ways.  Soft lighting brings warmth to empty spaces, while high wattage bulbs can make small spaces feel larger.  If your home doesn’t get enough light, solar tubes are an attractive and energy-efficient way to bring in natural light (and are much cheaper than skylights!)

2)  Don’t Procrastinate on Care and Maintenance – Before you undergo the costly vanity upgrades, like your new custom kitchen, do the necessary stuff first… like fixing leaks, insulating the attic, fixing problematic gutters, replacing old windows, and such.  I know it’s not fun, but these items will quickly increase the value of your home, as well as make it much easier to sell.

3)  Do Your Pruning and Landscaping – Unruly trees and bushes can block the front view of your home and if they can’t see it, they won’t buy it.  Landscaping does make a difference as well.  Often, spending a few hundred dollars can bring you much larger returns.  Not to mention, if you don’t maintain your large trees, fallen branches could cost a great deal in damages.

4)  Create Space – Open-floor plans and large spaces are quite popular these days and buyers want homes to “flow.”  So, check with a structural engineer and knock down that non-structural wall!

5)  Upgrade Your Front Entry – If your home does not have an overhang or awning over the front door, many buyers notice immediately.  No one wants to be in the rain while shuffling for their keys.

6)  Replace or Repair Your Flooring – Replacing the flooring will often pay returns during your home sale.  If replacement is not necessary, like in my home where Pottery Barn wishes they had my original hardwood floors, a few well-placed nails can help to eliminate squeaks.  It is also very worth it to replace broken tiles.

7)  Do Some Cheap and Easy Bath Upgrades – If you are ready to sell your home, but don’t want to do a costly bathroom overhaul, spend $500 on a bathroom facelift.  Remove rust stains, apply fresh caulk, update doorknobs and cabinet pulls, clean the grout… probably wouldn’t hurt to get a new toilet seat!

8)  Neutral Wall Colors – Most brokers recommend neutral wall colors.  I do if you already need to update your paint.  If your more colorful paint is fresh and you genuinely think there are many people who would appreciate it, go ahead and try to sell.  Before I was a realtor, I sold my home and my realtor recommended I repaint my walls neutral colors.  I did, and when I stopped by my former house several months later to see if the new owners had a piece of my mail, they had painted my living room almost the exact color that it was before I changed the paint to neutral!  On the flip side, most realtors have had buyers who didn’t want to purchase a home because of the paint color and they couldn’t visualize the home repainted.

9)  Eliminate “Potential Issues” – Have a friend come over and let you know everything that pops out about your home that could potentially be wrong, such as a broken step or way outdated wallpaper.  If buyers see too many issues that raise their eyebrows, they will be more hesitant to make an offer.

10)  Green, Green, Green – Green homes sell faster and for more money.  Make sure you have proper insulation.  If your heating, air conditioning, or water heater need to be replaced, new ones are often 30-40% more efficient, and even more so when you purchase ENERGY STAR appliances.  I always point it out to my clients when homes have new heaters and water heaters, because it is something they won’t have to worry about for a few years.